HEADER - Web

Home About Me Tutorials Recipes Grab a Button Contact Shop Image Map

Friday, June 21, 2013

Balsamic and Basil Marinated Chicken


Tom requested I make chicken with basil. Ok really broad suggestion right? So I went of a search for a yummy basil chicken recipe. I stumbled across a balsamic, garlic and basil chicken breast recipe from For the Love of Cooking. If you have never checked out her blog before, you should. I got hungry looking at all her recipes! Back to the marinade, I followed her recipe very closely, but I used pesto instead of basil (because our herb garden has not produced enough basil yet). Here is my version of her recipe!

Ingredients:

- 1/4 cup of olive oil
- 1/2 cup of balsamic vinegar
- 2 cloves of minced garlic
- 1 tablespoon pesto
- To taste sea salt and cracked pepper
- 4 chicken breasts

Directions:

1. In a gallon sized zip lock bag, combine the olive olive, balsamic vinegar, minced garlic (we buy garlic already minces because we use it so often), pesto (we had recently bought some from Costco just to try, it isn't as good as my homemade recipe, but it is still pretty good), sea salt and cracked pepper. Mix, and add the chicken breasts. 

2. Marinate in the fridge for 24 hours. For the Love of Cooking suggested 2-24, but we feel the longer it marinated the better. :) 

3. Heat your grill of high. Place the chicken on the grill and cook until the juices run clear. 

We served our chicken with some corn and a salad. It was super delicious! We will definitely be making this again! 

Thursday, June 20, 2013

My Favorite Things

Welcome to the first ever My Favorite Things Linky Party! I am so excited to get this started! For those of you who didn't read the introduction you can see it here. Now that I have that out of the way, let's get started!

This month I would like to share my favorite hairspray with you. I was hesitant to make this my first topic, simply because I am not a beauty blog, but I just HAD to!

There are some beauty products that I am super loyal to. One of them is hairspray. I have used Kenra Volume 25 spray for the longest time and it just works the best! Styling my hair was a pain in the booty before I stumbled upon this gem! But believe it or not I found something better than Kenra Volume 25.


Well, I don't know if I would call it better. It is the same exact thing, just cheaper! I was at Sally's one day buying a new straightener (the one I had for years finally broke :( ) and after picking out a new one I was roaming around the store. While glancing at the hairspray section, a bottle of Generic Value Products hairspray caught my eye (or was Heaven shining down on the bottle? I get confused)! Anyway, ;) I noticed the price was cheaper, it appeared to have the same ingredients, and it smelled just like the real stuff. Since Sally Beauty has a really great return policy I decided to buy a bottle and try it out.

I can honestly say the Generic brand works just like Kenra Volume 25. My hair stays curly all day, my style doesn't melt with the heat or humidity, and it sprays on amazingly! A plus with this brand of hairspray is it smells really good. Believe me I have tried a lot of hairsprays and some of them smell nasty! Aqua Net anyone? Ewe, I'm pretty sure most things smell better than Aqua Net. You really should give this product a try though! You can find Generic Value Products Volumizing Spray (Compare to: Kenra Volume Spray) at a Sally Beauty store or on their website. This hairspray is only $7.99 for a 10 ounce bottle with your beauty club card or $8.99 without.

The Upstairs Crafter
<div align="center"><a href="http://theupstairscrafter.blogsp

I can not wait to see what you guys have to share! Be sure to grab a button so others can join in on the fun. Also, make sure to link up below! :)


Wednesday, June 19, 2013

Crafting To-Do List

Happy Wednesday everyone! Today my pins are coming from my Crafting Board on Pinterest, be sure to check it out for more ideas and (dare I say it) pinspiration! :)

Also, visit again tomorrow! I will be hosting My Favorite Things, my very first linky party! Be sure to grab a button and link your post up too! Hope to see you tomorrow!


Friday, June 14, 2013

My Favorite Things Preview

Hello my lovelies! I would like to start my own little link up party! Please feel free to join in on the fun and share your favorite things too!

I am starting this linky party because I have found some really amazing products that I absolutely love, and I want to share them with others! I figure I can’t be the only person who feels this way. Right?

Here's how it will work. On the third Thursday of every month, write a review about your favorite thing. It can be your favorite product or really anything you want! Your favorite hairspray, your favorite hot glue gun, an amazing pair of fabric scissors, a spatula, lotion, you get the picture right? Make sure to include WHY you love it so much. And maybe a little back story of how you stumbled upon it?

Our first link up will we Thursday, June 20th, so get ready!! Please be sure to grab a button so everyone knows where to link up!

The Upstairs Crafter
<div align="center"><a href="http://theupstairscrafter.blogspot.com/" title="The Upstairs Crafter"><img src="http://i1293.photobucket.com/albums/b596/TheUpstairsCrafter/FavoriteThingsFinal390_zps1c741931.png" alt="The Upstairs Crafter" style="border:none;" /></a></div>


Now all you need to do is publish your post and link it up so other people can read it and enjoy!

Type in your blogs name under "Link Title". Make sure you enter in the ENTIRE URL where we can find your post! That way people can click on your link and go DIRECTLY to your Favorite Things blog post. :)

I am so excited to see what you guys have to share every month! If you have ANY other questions about this link up please let me know and I will be happy to help you! 

Wednesday, June 12, 2013

Breakfast Yummies

Ever get bored of having the same bagel for breakfast everyday? I sure do. Here are some yummy recipes from my Pinterest Board Breakfast Yummies. Be sure to check it out! :)


Monday, June 10, 2013

Birthday Adventures

In the weeks leading up to my birthday, I had no idea what I wanted to do to celebrate it. Of course Disneyland was on my list, but we really didn't want to spend that much money and plus we just went before Christmas. So that idea was out! Then I thought the beach. I have always wanted to visit a beach in California. I don't know why but it just seems so much better than an Oregon beach. But then I heard a commercial on the radio for the San Diego Zoo! I proposed the idea to Tom (if we are taking a trip I wanted to make sure he had fun too!) and he thought it was an awesome idea. So we started planning our zoo trip!

I was pretty much on the zoo's website everyday, all week long. I would watch the live cams of the animals and browse at everything they had to offer. Yeah, I was really excited! Since my birthday was on a weekday we really couldn't go then, so Tom took me out to my favorite restaurant. I basically just got to relax after work which was really nice! 

On Saturday we woke up early to head out, and still didn't make it out the door on time! ;) We are pretty much always late... BUT we are getting better! Only 10 minutes late that time! After a quick breakfast stop we were on our way!!

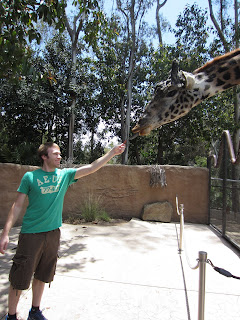
This trip was one of the most fun things we have ever done together. We got to see so many animals we had never seen before, and most importantly we got to feed the giraffes!! AHHH!! It was the PERFECT day! If you have never been to the San Diego Zoo before, you really need to go! :) 

Get ready for a picture explosion! Here are some of the pictures we took. I tried to pick the ones that documented our favorite things that happened! :)


Waiting in line for giraffe feeding tickets!!


Our turns next!


Most AMAZING experience EVER!!! 
His tongue wrapped around your hand!


We had never seen a koala bear before. 
It's safe to say we both love them now!


A kangaroo finally woke up and hopped around for us!


This is a honey badger. He was so playful and cute! 
He reminded us of a kitten. 


We were right next to this guy. So awesome.


AHHHH we were SO close to a polar bear!! I love polar bears! 


Tom found a polar bear book and was reading it to me. 
Pretty much my three favorite things: Reading, Polar Bears, and Tom <3 font="">


Right next to a sleeping hippo!!


The end of our trip!

A note to all future zoo-goers. Wear sunscreen! We were silly and didn't, and we payed the price! Still a great trip though with amazing memories! :) Thanks for reading!

Saturday, June 8, 2013

DIY Wall Flower Tutorial

Remember my first Oh, How Pinteresting link-up? In this post I told you to keep your eyes peeled for a certain project, well here is the finished project!


Cute right?! Not to mention it's made up of almost all recycled materials, and costs you little to nothing to create (everyone loves a cheap project right?)! 

So are you ready to learn how to make your own Wall Flower? Well let's get started!

What You will Need:

- A hot glue gun and glue
- Spray paint 
- Scissors
- Ruler
- Pencil
- Lots of toilet paper and paper towel rolls!

Directions:

1. Start saving your toilet paper and paper towel rolls! Yes, this is a step. I had been saving rolls since before Christmas and only JUST had enough to make my flower large enough. How many rolls do you need? Great question, depends on how big you want your flower to be. Unfortunately I did not count how many rolls I had before I started cutting them :( 

2. Once you have enough rolls saved up (or you think you have enough rolls saved up! I had to "start" the project about three times before I could actually start the project), fold the rolls in half so they turn into a flat surface. Using your ruler and pencil, measure out the width of your petals. The very center of my flower has 2" tall petals. The next height is 1 1/2", 1", and so on and so forth. Cut the rolls on the marks you created. 

3. As you cut, be sure to start planning your design out so you know how many more petals you need to cut, and in what size. 


I cut the petals and created my shape as I went. 
Thomas was very interested in the flower and kept trying 
to steal the petals and play.. Silly guy :)

4. Once you have all your petals cut, and you have decided on you design, it's time to glue! 

5. Start gluing from the center of your flower, working your way out until you have no more petals left.


Here it is all glued together!

6. Spray paint your flower (make sure to follow the directions on your spray paint bottle!). I used about three coats of Krylon's Island Splash. 

7. Let your flower thoroughly dry. To hang on your wall, simply put a nail in the wall where you want the center of your flower to be, then hang the center petal on that nail. 

ALL DONE!!

SUPER easy right!?!?! I know I don't have any pictures of it hanging on my wall. I am currently waiting on some pictures to be printed out to hang around the flower. I will be sure to post an update with everything complete as soon as it's done though!  Let me know how your flower turns out! :)


Tuesday, June 4, 2013

Home Lovin'

I'm alive! As you can probably tell I needed to take a little break from blogging, but I'm back now and ready to roll! Be sure to stop by later this week to check out a DIY wall art tutorial. If you follow me on Instagram you have a sneak peak of what's to come! GET EXCITED! ;)

All I can think about is decorating and planning my future non-existent home. Needless to say I have been feeling very homey lately. I guess you could say apartment living is kind of lame. You can't paint your walls or do anything fun gosh darn it!

So here are some things I have been dreaming about lately! Enjoy :)