HEADER - Web

Home About Me Tutorials Recipes Grab a Button Contact Shop Image Map
Showing posts with label I Did It!. Show all posts

Friday, December 13, 2013

DIY Popsicle Stick Snowflakes


Its beginning to look a lot like Christmas around our apartment! I love putting up our decorations and making the place look like elves live with us, the animals love it too! Our hallway was looking a little bare so I decided to make some popsicle stick snowflakes to hang on two of the doors. I love how they turned out and will definitely be making more for around the house, I'm thinking some will even be red! 

The nice thing about these snowflakes is you can leave them up after Christmas ends so your house doesn't feel so bare and dull. I always get sad when I have to put my Christmas decorations away, so I am all about the "transition" decorations. Want to make some of your own? Read on!

You will Need: 


- Popsicle Sticks (I used 24 for the small snowflake and 36 for the large snowflake)
- Paint or Spray Paint of your color choice
- Hot Glue Gun and Glue Sticks
- Ribbon, Nail, and a Hammer to hang

Directions:


1. Paint or spray paint your popsicle sticks the color of your choosing.

2. After your popsicle sticks have dried, begin gluing the sticks together to form your snowflake design.

3. Once completed, cut a piece of ribbon and use it to hang your snowflakes where you want them displayed. You could even just use a nail if you are hanging them on the wall!

And that's all you need to do to create you very own popsicle stick snowflakes! Here are my finished products.


If you need more inspiration for snowflake designs check out these pins from my Pinterest Christmas board.


Be sure to grab my button and link up your own popsicle stick snowflakes below! ;)

The Upstairs Crafter


Sunday, September 15, 2013

Good Ideas - 10 Halloween Projects

Halloween is just around the corner! Can you believe it? I love this time of year. Cool mornings, leaves changing colors, boots, scarves, pumpkin spice lattes! ;) It is just a beautiful season.. Plus, it means Christmas is just around the corner!! Go ahead, call me crazy. I can't help loving Christmas, but I am getting ahead of myself.


To get in the Autumn spirit, here are some of my favorite Halloween Pins


Burlap Boo Bunting via R & R Workshop


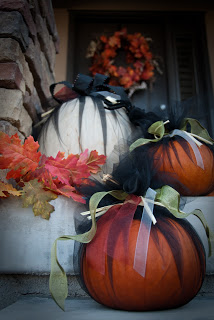
Spray Painted Boo Pumkins via HGTV


 Happy Halloween Bunting via Etsy


Pretty Pumpkins via McKay & Dixie


Mini Pumpkin Dcoration via Ten June


Door Sign via Eleven Magnolia Lane


Creative Use of Pumpkins via Better Homes and Gardens


Boo Sign via Etsy


Paper Pumpkin via Two Paper Divas


Chic Halloween Ribbon Wreath via Bowdabra Blog 

Don't forget you can link up your Halloween creations and tutorials here. Can't wait to see your lovely projects!! :)

Friday, September 13, 2013

"I Did It!" Pinterest Edition


It's no secret, I love Pinterest. However, I feel like I spend way too much time simply browsing through everything. See I have this sickness, I find and pin thousands of awesome projects, and then I never complete them. Or even worse, I pin a project, buy all the supplies I need for it, then never finish the project. Can you say Pinterest fail?

When we were packing for our move I was going through my crafting and sewing supplies and realized just how many unfinished projects I had laying around. It was then and there that I promised myself I would start to actually finish said projects once we settled in our new place!

And thus my series "I Did It!" Pinterest Edition was born!

For my first project I am going to share a cute little sewing project I found a while ago. It is an ADORABLE little fox stuffed animal! Here is the original pin:


This project is a lot easier than I thought it was going to be. I always get intimidated with new projects, and this was certainly out of my sewing comfort zone! My seam ripper was close by at all times, as were my printed instructions. Make fun of me all you want, but I like things to be perfect. Especially when this little guy is a present for someone ;)

Here are some pictures from the creative process :)


I always have my helper nearby!


Snuggling the little fox.

I still need to put eyes and a nose on the little guy. I think I am going to use felt but I haven't decided! After I sewed the fox and stuffed him I decided he was too small. I also decided that I wanted the bottom to be flat so he could sit on a shelf (I don't know when I decided the fox was a he, but it is). So I am currently working on enlarging the pattern and tweaking it a bit to better suite my fox stuffed animal needs! When I have modified the pattern I will post a tutorial for you all! 


The Upstairs Crafter
<div align="center"><a href="http://theupstairscrafter.blogspot.com/" title="The Upstairs Crafter" target="_blank"><img src="http://i1299.photobucket.com/albums/ag73/speckdoodle/250x250IDidIt_zpsaa6dd261.png" alt="The Upstairs Crafter" style="border:none;" /></a></div>

If you would like to participate and share your Pinterest creations please do so! For now please grab the code and link up below! I would eventually like to make this a weekly linky party, so participation would be amaze-balls! :) If you have any suggestions about making this a linky party (perhaps hosting it every other week instead?) I would LOVE to hear read them! Just leave your ideas in the comments below. Or if you have any advise to offer about hosting your own linky party that would be appreciated as well! Thanks everyone!