HEADER - Web

Home About Me Tutorials Recipes Grab a Button Contact Shop Image Map
Showing posts with label Recipes. Show all posts

Wednesday, February 12, 2014

Perfect Pot Roast


A good pot roast recipe is something everyone needs in their cooking repertoire, and the recipe I will be sharing with you today is the perfect addition! Pot roast is a favorite meal in our house. I love it because it is so simple to make. It's one of those "fix it and forget it" meals, so you can whip everything up and binge watch Netflix. Have I convinced you to make pot roast for dinner this week yet?

Before you hit the grocery store, you want to make sure you have the right cut of meat. My very favorite is the chuck roast. It has a lot of fatty tissue which makes the meat melt in your mouth delicious when cooked for a long period of time at a lower temperature. I have used rump roasts in the past with no complaints from my picky eater, they just never turn out quite as tender as a chuck. 

Now let's get cooking! 

Ingredients:


- Chuck Roast (about 4 pounds)
- 3 tablespoons Olive Oil
- 2 Red Onions (cut into fourths)
- 6 Carrots (cut into 1-2 inch long slices)
- 1 cup Red Wine (optional)
- 3 cups Beef Stock
- 1 Tablespoon Rosemary
- 1 Tablespoon Thyme 
- Salt and Pepper to taste 

Directions:


1. On your stove top heat a Dutch oven over medium high heat. Once the Dutch oven is warm, pour in 2 tablespoons of olive oil and heat.

2. Once the oil is hot (but not smoking) add in the onions. You will brown one side, then the other. Remove the onions to a plate as they just start to become soft and fall apart. 

3. After you remove the onions, add the carrots to your Dutch oven and toss for about 1 minute. Remove and place on the onion plate with they are slightly brown and just start to become soft. 


4. Add 1 tablespoon of olive oil to the Dutch oven. Place your roast in the pan and sear on all sides. You want the roast to be nice and brown all over. You may want to grab some tongs to make searing the sides easier. Remove the roast to a plate. 


5. With your heat still on medium high, pour in 1 cup of red wine to deglaze your pan, use a whisk to get all the yummy "brown stuff" off the bottom of your pan and mixed in with your wine. If you wish to omit the wine (for some crazy reason) you can substitute 1 cup of beef stock. 


6. Once you are done deglazing your pan, place the roast back in and add beef stock to cover the roast halfway (about 2-3 cups). Add in the onion and carrots to the sides of the roast. 

7. Sprinkle about 1 tablespoon of rosemary and thyme over your roast. I say about because I almost never measure my seasonings into my roast. So this is a pretty accurate guesstimate. If you would prefer to use fresh thyme and rosemary, use about 3 sprigs each. 

8. Salt and pepper to taste. I recommend using a course salt such as Penzys Grey Sea Salt. Kosher salt would also be a good choice!  

9. Put the lid on your Dutch oven and roast in a 275 degree oven for 4 hours (4-5 pound roast). For a 3 pound roast plan on about 3 hours. Now go fire up Netflix. 

Be prepared for your house to smell heavenly while you are waiting for your roast to be done. Try to fight the temptation to open your oven and peek at your roast. Trust me, just let it be! In about 4 hours your timer will go off and you will open your Dutch oven to find this little piece of Heaven awaiting you.


Yummy. To insure the roast is cooked thoroughly, use a fork to open the roast. If the meat falls apart easily, it's done. As a side note: A lot of people like to throw in potatoes while they cook the roast. I am not totally against that, however I find that the potatoes turn out lacking in flavor and very soggy. For this reason I prefer to make roasted or mashed potatoes, the latter being my favorite. 


I normally serve this straight out of the pan. That way everyone can pick how much meat and veggies they want. But if you are having a fancy dinner party (roast is always an awesome dinner choice for a dinner party) serve the roast on a platter with the veggies separate. Be sure to have a small serving bowl with extra juice so guests can drizzle it over their meat and potatoes as well! 

Good luck! 

Tuesday, December 17, 2013

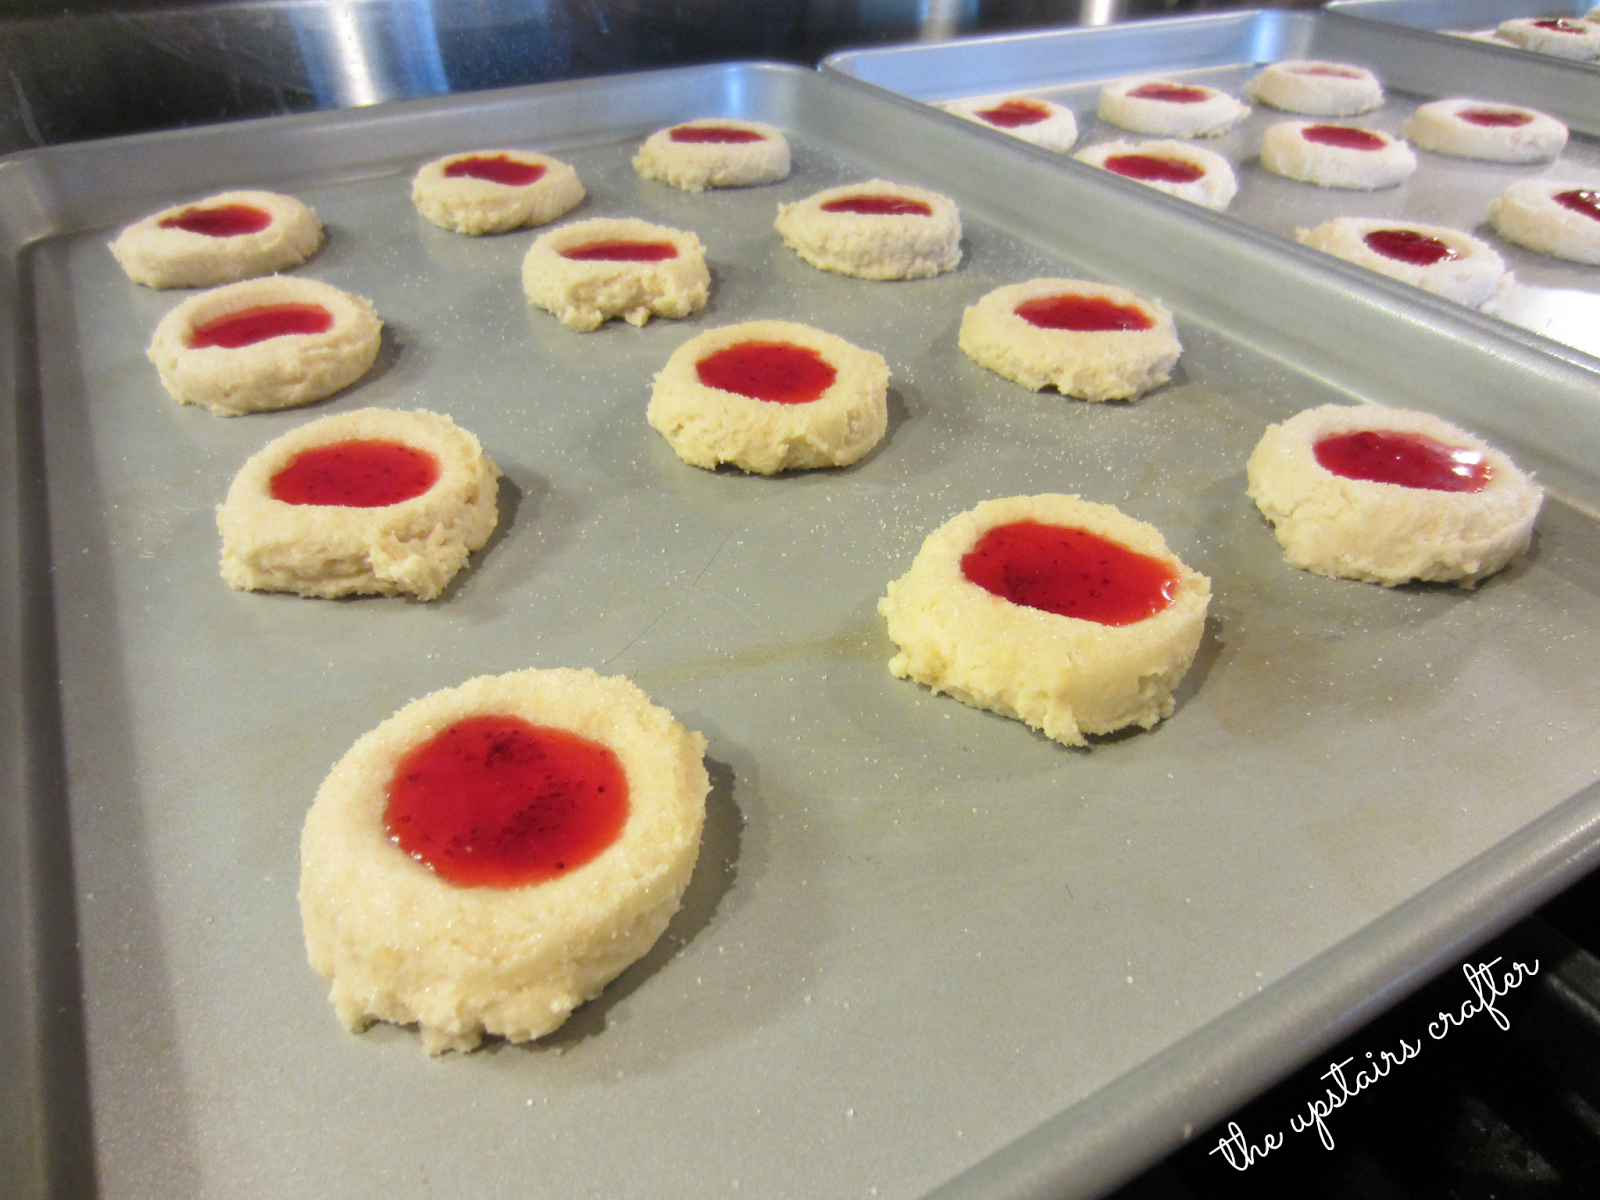
Easy Thumbprint Cookies


Did your hubby forget to mention you need to bring a dessert to that Christmas party you are supposed to go to tonight? Or do you have some unexpected holiday guests that just arrived? I'm here to save your day with my easy, no fuss Thumbprint Cookie recipe. 

The great thing about this recipe is you only need seven ingredients, and chances are you already have everything you need! Bonus for not being forced to run to the store in your PJ's for that last cup of shortening.. not that I have ever had to do that of course. ;)

I fill my cookies with jam or jelly, but they could easily be filled with caramel, Nutella, a Hershey Kiss, really just about anything! Obviously it is your preference, I just stick with jam because I love it and typically always have some on hand. Ready for the recipe that is about to make your life a little easier?

Preheat your oven to 375° and follow these simple instructions :)

Ingredients:

- 2 cups Flour
- 3/4 cups Powdered Sugar 
- 1 Egg
- 1 teaspoon Vanilla
- 1 cup Butter (soft)
- small amount of Granulated Sugar
- filling of your choice 

Directions:

1. Combine flour, powdered sugar, egg, vanilla, and butter. Mix well.

2. Roll into balls and place on non-greased cookie sheet. 

3. Sprinkle granulated sugar on top of cookie dough balls and use the bottom of a cup dipped in granulated sugar to flatten the dough balls. 


4. Use your thumb to make indents in the cookies. 


5. Fill cookies with the filling of your choice. I used raspberry and strawberry jam. 


6. Bake for 8-10 minutes (9 is perfect in my oven). 

I would say this recipe makes about three dozen cookies, but it really just depends on the size you make your cookie dough balls. From my experience, making a double batch of this recipe never hurts! They are real crowd pleasers and it is always nice to be left with extras for yourself. ;)

Tuesday, November 19, 2013

Better Than Tollhouse Cookies


Everyone loves chocolate chip cookies! This recipe is not only super simple, but also some of the best cookies you will ever eat. Promise. I love my cookies just golden brown on the outside and super squishy, gooey on the inside! Do I have your mouth watering yet? Read on! 

Shout out to my awesome Mom for giving me this recipe, who got it from her awesome friend way back in the day! That right there should PROVE that this recipe is a must have for your recipe collection. It stands the test of time! :) This recipe is definitely a go to in our house and is the only chocolate (and white chocolate!) chip cookie recipe I make. 

Now, preheat your oven to 375° and follow these simple instructions :)

Ingredients:

- 2/3 cup Shortening
- 2/3 cup Butter (soft)
- 1 cup Sugar
- 1 cup Brown Sugar
- 2 Eggs

- 2 teaspoons Vanilla
- 3 1/2 cups Flour
- 1 teaspoon Baking Soda
- 1 teaspoon Salt
- 12 ounces Chocolate (or White Chocolate) Chips

Directions:

1. Combine shortening, butter, sugar, brown sugar, and eggs in mixing bowl. If you notice this if the first section of the ingredients list (the space wasn't a typo, I did that to make your life easier!). Mix until all ingredients are well blended. I use my handy dandy Kitchen Aid to mix everything. However I have mixed everything by hand before!

2. Add in your vanilla, flour, baking soda, and salt. Mix until all ingredients are well blended. If you are using a Kitchen Aid you may want to cover the bowl with a towel so you don't get flour all over you!

3. Add in your chocolate chips (or white chocolate!). Notice how I keep adding in white chocolate chips? That is Tom's favorite way I make them. I am a sucker for the real chocolate, but both ways are yummy! Mix super well.

4. Roll into balls and place on a non-greased baking pan. Bake for 8-10 minutes (9 is perfect in my oven) or until cookies are a light golden brown. 


I would say this recipe makes about three dozen cookies. That is if you don't eat all the cookie dough first.. Enjoy your cookies and get ready for everyone to bombard you for the recipe! ;)

Friday, November 8, 2013

Crock Pot Chicken Taco Chili


Let me begin by saying I LOVE my crock pot! It is seriously the best invention ever! I am always on the lookout for amazing recipes to try out because let's face it, crock pots are just so darn handy.

I originally found this recipe off of Skinny Taste. As you can probably guess I changed it up, and it is to die for yummy! Honestly this is probably my favorite crock pot meal. Here's the recipe for 10 servings. 

Ingredients:

- 2 10 ounce cans of diced tomatoes and green chilies
- 15 ounce can of tomato sauce
- 15 ounce can of corn
- 15 ounce can of kidney beans
- 15 ounce can of black beans
- 1 onion, chopped
- About 1 tablespoon chili powder
- 3 tablespoons taco seasoning (warning: some taco seasonings are spicier than others!)
- 3 boneless, skinless chicken breasts, precooked and shredded
- Fresh cilantro, chopped
- Cheese of your choosing

Directions:

1. In your crock pot combine: tomatoes and green chilies, tomato sauce, corn, beans, onion, chili powder, and taco seasoning. Add the precooked, shredded chicken on top, do not stir in. I have used both precooked and uncooked chicken, and I think precooked comes out better. I usually just whip up a bunch of chicken over the weekend to use in recipes throughout the week. :)

2. Cover and cook on low for 10 hours or on high for 6 hours. 

*If using uncooked chicken: half an hour before serving, remove the chicken from the crock pot, shred, and return to pot. As a side note, I used uncooked chicken once and it actually came out drier and not as flavorful. I suggest using pre-cooked chicken, but to each his (or her) own! 

3. Top chili with fresh cilantro and cheese! 

If it sounds easy, that's because IT IS!! This is a great dish for when guests come over. It has been a real crowd pleaser in our house, and has saved me from cooking elaborate meals! Pairs perfectly with corn bread as well! I am planning on making this with leftover Thanksgiving turkey this year. I feel like it will be SUPER yummy!

What is your favorite crock pot recipe?? Be sure to share it in the comments below! :)

Sunday, October 6, 2013

Good Ideas - 14 Pumpkin Recipes


When the fall season comes around, it seems like everyone goes on a Pumpkin craze. I can freely admit I am one of these people. I am a sucker for pumpkin spice lattes, pumpkin pie, pumpkin muffins, and recently pumpkin cookies. So I have compiled 14 Amazing Pumpkin Recipes. I even threw in a pumpkin treat for your furry, four legged friends! ;) Enjoy!


Pumpkin Cheesecake Muffins via Recipes, Food and Cooking


Double Chocolate Pumpkin Cake via Picky Palate


Pumpkin Bars with Fluffy Cream Cheese Frosting via Cooking Fancy


Pumpkin Bread with Streusel Topping via Bakingdom 


The Great Pumpkin Cake via A Merrier World


Soft Frosted Pumpkin Spice Cookies via The Baker Chick


Pumpkin Cream Cheese Bars via Chocolate Covered Katie


Pumpkin Pie Fudge via A Housewife


Pumpkin French Toast via Yummy Inspirations


Pumpkin Pancakes via {at home} with Bobi


Pumpkin Spice Syrup via Cook Like a Champion


Pumpkin Spice Latte via Farm Girl Gourmet


Pumpkin Juice via Craft Envy


Pumpkin and Flax Seed Good-Dog Treats via White on Rice Couple

Stay tuned for a BIG announcement coming soon! :) 

Wednesday, September 25, 2013

Black Bean Quinoa


Quinoa seems to be all the rage these days. Not only is is super yummy, it is also really good for you! It actually beat brown rice in a health food face-off. You can see those results here. I have tried making quinoa a couple of times now and each time it came out a little.. crunchy, under cooked, however you want to say it. So I gave up on it for a while. Then the other day a genius idea popped into my head, rice cooker.

My sweetie bought one that has just been sitting in our kitchen unused for the past year, so I pulled that puppy out and gave it a try. Let me tell you, I am now a huge supporter of rice cookers. The quinoa cooked perfectly, and it was so easy to prepare! Just throw it in with some vegetable broth and let it sit! Easy peasy.

Now that I can actually get the quinoa properly cooked I plan to use it more. The great thing about quinoa is it can be served as a side dish, but with the right combination of ingredients it can also be a main course. I cooked this Black Bean Quinoa as a main course and it not only filled me up, but my honey as well. So without further ado, here is my recipe for Black Bean Quinoa, enjoy!


Ingredients:


- 1 cup uncooked, organic quinoa (a little goes a LONG way!)
- 2 cups organic vegetable broth
- 1 small red onion, peeled and chopped
- 3 cloves of garlic, minced
- 1 can of black beans, rinsed and drained
- 1 can of corn, drained
- 1 green bell pepper, chopped
- Savory Spice Shop: El Diente Peak Southwestern Seasoning (you can purchase some here) to taste
- Salt and Pepper to taste
- 1/2 cup chopped cilantro

Directions: 


1. Rinse your quinoa to remove the powder. Place quinoa in your rice cooker with your organic vegetable broth. 

*If you are not using a rice cooker, follow the instructions on the bag to cook on your stove top. 

2. Stir in onions and garlic. Season with El Diente Seasoning, salt, and pepper. Set the time for your quinoa to cook and let the rice cooker do it's magic! I always cook on the "Quick Cook" setting ;)

3. Steam your green peppers in the microwave (I use a little olive oil and cook them for about 1 minute), and heat up your beans and corn as well.

4. Once your quinoa is done, combine all ingredients and mix well. Stir in freshly chopped cilantro and add more seasonings if needed. 

There you have it! Super easy, super healthy, and SUPER yummy! This one will definitely be one of my "stand-by" recipes for when I don't feel like cooking! ;) Have a great day everyone, and thanks for stopping by! 

Friday, June 21, 2013

Balsamic and Basil Marinated Chicken


Tom requested I make chicken with basil. Ok really broad suggestion right? So I went of a search for a yummy basil chicken recipe. I stumbled across a balsamic, garlic and basil chicken breast recipe from For the Love of Cooking. If you have never checked out her blog before, you should. I got hungry looking at all her recipes! Back to the marinade, I followed her recipe very closely, but I used pesto instead of basil (because our herb garden has not produced enough basil yet). Here is my version of her recipe!

Ingredients:

- 1/4 cup of olive oil
- 1/2 cup of balsamic vinegar
- 2 cloves of minced garlic
- 1 tablespoon pesto
- To taste sea salt and cracked pepper
- 4 chicken breasts

Directions:

1. In a gallon sized zip lock bag, combine the olive olive, balsamic vinegar, minced garlic (we buy garlic already minces because we use it so often), pesto (we had recently bought some from Costco just to try, it isn't as good as my homemade recipe, but it is still pretty good), sea salt and cracked pepper. Mix, and add the chicken breasts. 

2. Marinate in the fridge for 24 hours. For the Love of Cooking suggested 2-24, but we feel the longer it marinated the better. :) 

3. Heat your grill of high. Place the chicken on the grill and cook until the juices run clear. 

We served our chicken with some corn and a salad. It was super delicious! We will definitely be making this again! 

Sunday, March 17, 2013

Just like Auntie Anne's Soft Pretzels

My boyfriend LOVES Auntie Anne's soft pretzels. Whenever we go to the mall he always has to stop and get at least one. He requested I learn how to make them. So after browsing the Internet for a good recipe, and doing some fine tuning of my own, I have come up with the perfect home made pretzel recipe!

This recipe makes about 12 pretzels and is ready in about 1 1/2 hours. 

Ingredients:

-1 1/2 cups warm water
-1 1/8 teaspoons active dry yeast
-3 tablespoons brown sugar
-1 1/8 teaspoons salt
-1 cup bread flour
-3 cups all-purpose flour
-2 cups warm water
-2 tablespoons baking soda
-Course salt to taste
-4 tablespoons melted butter

 Directions:

1. In a mixing bowl add 1 1/2 cups warm water, stir in yeast to dissolve. 

2. Add in brown sugar and salt. Stir to dissolve. 

3. Add in the bread and all-purpose flour. On a floured surface, knead the dough until smooth.

4. Place dough in a large bowl, cover with plastic wrap (or a damp cloth) and let the dough rise for at least 30 minutes. 

5. While the dough is rising, prepare a baking soda water bath. Dissolve 2 tablespoons of baking soda in 2 cups of warm water. Stir often. 

6. After dough has risen, pinch off bits of dough and roll into long sticks. I just leave mine as sticks, it is easier and takes less time to shape. :)

7. Dip the formed pretzels in the baking soda solution. Place on greased baking sheet.

8. Recover the pretzels with plastic wrap (or a damp cloth) and let them rise for another 30 minutes. 

9. Preheat oven to 450 degrees. 

10. Cook pretzels for about 8 minutes or until golden brown. 

11. To finish, brush cooked pretzels with melted butter and sprinkle with course salt. I sometimes sprinkle cinnamon sugar on top for a yummy treat! 

If you have leftover pretzels store them in an airtight container or plastic bag! We leave ours on the counter, we find putting them in the fridge makes them a little soggy. 

I hope you enjoy this recipe as much as we do! They make a great afternoon snack, and would be really fun to make with little kids! Next time I make them, I will post a picture so you can see the finished results! :)

Sunday, March 10, 2013

Calzone Recipe

Last Sunday we made the YUMMIEST calzones for dinner! I got all of the recipes from the "How to Cook Everything" cookbook (everyone should get this cookbook, by the way). I did change up some parts of the recipes, so that is what I will be sharing with you today. :)

Do not let all the steps and instructions intimidate you! This is a really easy recipe to make and is SUPER yummy!! You should make it at least once in your lifetime! :)

Basic Pizza Dough 

-1 teaspoon instant or rapid-rise yeast
-3 cups bread flour (you can also use all-purpose flour)
-2 teaspoons coarse kosher salt
-1 to 1 1/4 cup water
-2 tablespoons plus 1 teaspoon olive oil

1. Combine the yeast, flour, and 2 teaspoons of salt in a large bowl (I used my Kitchen Aid with the dough hook). Begin mixing, add 1 cup of water and 2 tablespoons of olive oil.

2. Gradually add more water until dough forms into a ball and is slightly sticky to the touch. If your dough become too sticky, add a small amount of flour at a time.

3. On a floured work surface, knead the dough by hand to form a smooth, round dough ball. Grease a large bowl with the remaining olive oil, and place the dough inside.

4. Cover with plastic wrap (or damp cloth) and let the dough rise for 1 to 2 hours.

**You can make this dough ahead of time and store it if the freezer for up to one month.**

While the dough is rising I make the pesto and get everything else ready to put inside the calzones.

Basic Pesto

-2 loosely packed cups fresh basil leaves (make sure they are rinsed and dried)
-2 tablespoons minced garlic (we LOVE garlic)
-1/2 cup extra-virgin olive oil (or more depending on how you thin you like it)
-1/2 cup Parmesan cheese

1. Combine the basil, garlic, and about half of the oil in a blender. Process, make sure you scrape down the sides occasionally.

2. Gradually add the rest of the oil and add the cheese.

3. Store in the refrigerator until you are ready to use.

**The recipe says to stir in the cheese by hand right before serving, I just do it all at once. You can store pesto in the fridge for up to two weeks, and in the freezer for several months.**

Calzone

The beautiful thing about calzones is you can put whatever you want inside! It is a great way to get rid of various leftover veggies sitting in your fridge, or even leftover meat! I like to use leftover chicken. Here is what I put inside our calzones!
-2 large chicken breasts (cut up into bite sized pieces)
-Mozzarella cheese
-Cheddar cheese
-Parmesan cheese
-Green peppers
-Artichoke hearts
-Sliced olives
-Pepperoncinis
-Red onion
-Extra garlic (I told you we loved garlic :])
-And of course the homemade pesto!

1. Once the dough is ready, knead it lightly, divide in half, and form into 2 balls. Place on a lightly floured surface, cover with plastic wrap, and let rise for 20 minutes.

2. Preheat oven to 350 degrees Fahrenheit.

3. Roll each dough ball into a flat round. Let the rounds sit for a few minutes, this will relax the dough and make it easier to roll out!

4. Roll the dough into an 8 to 10 inch round (like a pizza!) and place on a lightly oiled baking sheet.

5. Cover each form with the pesto. Fill with chicken, veggies, cheese, and whatever else your heart desires!

6. Moisten the edges with a little water. Fold one end over the other and press the calzone closed with your fingertips.

7. Bake the calzones for 30 to 40 minutes, or until nicely browned. Serve hot or warm!

Posting these pictures makes me hungry! :)


After cooking. They are HUGE! And so tasty! 

Each calzone will be enough for 2 (yes 2!) servings. It pairs great with salad! I love it with Caesar salad. This is really fun to make for a small dinner party. It would also be a fun way to get kids involved with making dinner! Let me know how your calzones turn out! :)